
About Checklist Steps
Checklist steps are the individual tasks used to build a Protocol Checklist. Each step is associated with a checklist type and can include a name, description, and display order. After checklist steps are created in Application Administration, they become available for use in protocol checklists and Checklist Templates.
Permissions Needed
AdminMain – Access the application administrative menu
EditClientandFacilitySettings - Along with App Admin, this permission should enable/disable the "Edit Client and Facility Settings" page
ManageChecklistSteps - Ability to manage Checklist Steps that are available when building a Checklist
Creating a Checklist Step
- Navigate to Application Administration
- Click on Edit and Client Facility Settings
- Click on Manage Checklist Steps under Client Settings on the right side
- Click Add New
- Select the Checklist Type from the drop down menu
- Enter a name for the Checklist Step
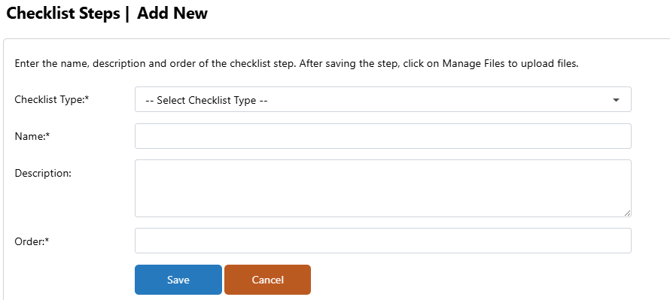
- Optionally, enter a description. The description will help ensure the step is completed the same every time and is visible when completing the step.
- Enter a numerical value in which the step should appear in an ordered list.
There can be multiple steps with the same value. This can be overridden when added to a Checklist Template or when manually adding to a protocol.
- Click Save
Repeat this step as many times to add all the necessary steps.
Editing a Checklist Step
Once a Checklist step has been used in a template or manually added to a protocol, you can no longer edit the Checklist Type or Name.
- Navigate to Application Administration
- Click on Edit and Client Facility Settings
- Click on Manage Checklist Steps under Client Settings on the right side
- Click Edit on the subcategory you wish to edit
- Apply the necessary changes
- Click Save
Editing a checklist step does not impact historical records or protocols where the step was used.
If the step has been added to a checklist template, the updated step will automatically be used when imported into a protocol. No changes to a template are required.
Inactivating a Checklist Step
Once a checklist step has been used, you can only inactivate the step. Inactivating the step prevents future use, removes the step from any templates, but does not impact historical records where the step was used.
- Navigate to Application Administration
- Click on Edit and Client Facility Settings
- Click on Manage Checklist Steps under Client Settings on the right side
- Click Inactivate on the reason you wish to inactivate
- Click OK to confirm the inactivation
Reactivating a Checklist Step
- Navigate to Application Administration
- Click on Edit and Client Facility Settings
- Click on Manage Checklist Steps under Client Settings on the right side
- Uncheck the Show Active Checklist Steps Only flag
- Click Reactivate on the reason you wish to inactivate
- Click OK to confirm the reactivation
- Optionally, you may add this step back to any Checklist Templates, if applicable.
Deleting a Checklist Step
Once a checklist step has been used, you can no longer delete the step. Deletions are permanent and cannot be reversed.
- Navigate to Application Administration
- Click on Edit and Client Facility Settings
- Click on Manage Checklist Steps under Client Settings on the right side
- Click Delete on the reason you wish to delete
- Click OK to confirm the deletion.