
In order to bill for a protocol, at least one account must be attached to the protocol. If no account is attached to the protocol, then all charges on the protocol will be billed as Do Not Bill and fall into the unbillable status. In this article, we cover how to Add a billing account to a protocol, including creating one, or changing the billing account.
Required Permissions
EditProtocolBilling - Ability to edit Protocol Billing tab. Protocol Management permissions are required
ViewBilling - View billing in a protocol. Protocol Snapshot permissions are required
Contents
Switching to a new Billing Account
Adding a Billing Account
There are two ways to create a billing account. One is done at the global level, but the most common method is to create the account at the protocol. This section will cover creating a new or adding an existing billing account.
Creating a New Billing Account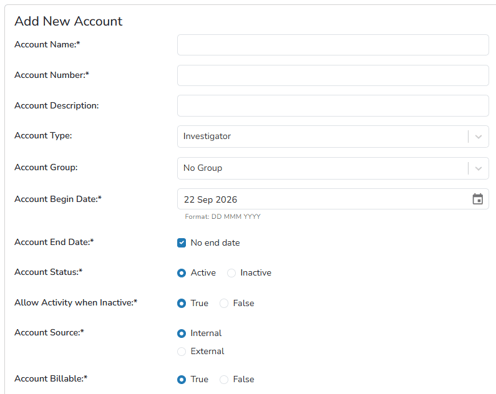
- Navigate to the Protocol
- Click on the Billing Tab
- Click on Manage
- Click Add New in the Billing Accounts for this Protocol Section
- In the drop down menu, select the option --Create New Account--
- The page will expand with additional fields for entry
- The only required user entries are for the Account Name and Account Number
- The rest of the fields are optional but can be modified as needed. For definitions, please see this article.
- When all fields are entered, click on the blue Submit button
Selecting an Existing Billing Account
- Navigate to the Protocol
- Click on the Billing Tab
- Click on Manage
- Click Add New in the Billing Accounts for this Protocol Section
- In the drop down menu, locate the Billing Account to add. Users can type in the name or number and Vestigo will filter out any accounts that don't meet the entry.
- Click the blue Submit button
Switching to a new Billing Account
Throughout a protocol lifecycle, the billing account for a protocol may change. When the IDS team receives notice of a new billing account was assigned to a protocol, users should add a new billing account to the protocol.
Warning - Billing Accounts should be treated like a Protocol Arm and once used, the original information should never be edited to something else. This will impact historical information.
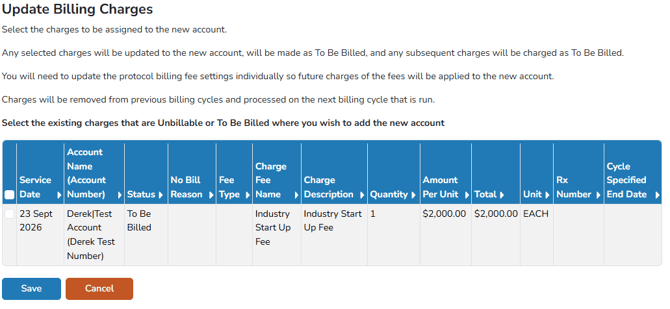
Users will want to follow the steps above to create or select an existing billing account. In both pathways, once users click on the Submit button and if there are any pending charges on the protocol, they will be presented with an additional function that will allow the user to select any fees that are not billed and change the billing accounts to the newly added billing account. Select all the fees that would apply to the account change and click Save, or click Cancel to return to the billing screen.
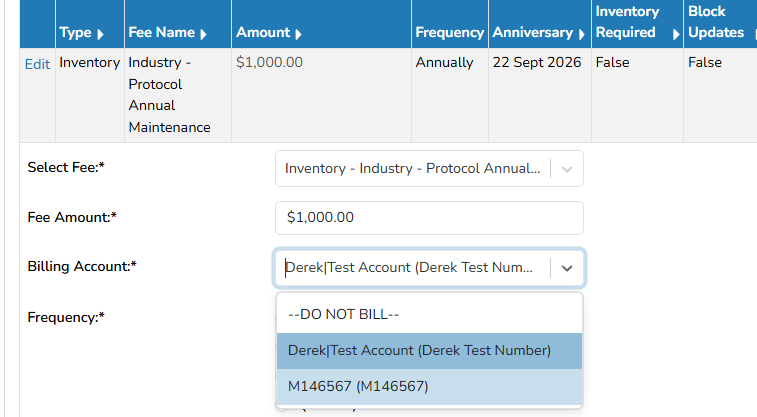
After the billing account is added, users will need to determine which protocol fees need to be updated to use the new account. This can be done by selecting Edit on the fee, changing the account, and clicking Save.
Removing a Billing Account
If a Billing Account is no longer needed on the protocol, users can optionally remove the account once all existing protocol fees are updated to use a different billing account. If there are still fees associated with the account, the account cannot be removed.
